Deploying Your First Web App to Tomcat on Docker
Docker is a platform for developers and sysadmins to develop, deploy, and run applications with containers. As we explained in the previous post, Docker containers wrap up software and its dependencies into a standardized unit for software development that includes everything it needs to run: code, runtime, system tools, and libraries.
In this post, we are going to step through a basic tutorial on getting a web application running on Tomcat Docker Container.
Tomcat
The Tomcat server is the most widely used open source implementation of the Java Servlet, JavaServer Pages, Java Expression Language, and Java WebSocket technologies. Apache Tomcat software powers numerous large-scale, mission-critical web applications across a diverse range of industries and organizations.
The sample TomCat application we will be using for this exercise is included in a git repository so that you can run through this tutorial easily.
In Tomcat, we have to move the war file to the CATALINA_BASE/webapps directory. Tomcat will then install it automatically and deploy the application for you.
We are going to use Tomcat 8.0 for this exercise.
Objective
By the end of this tutorial, you should be able to:
- Understand the basic concepts of Docker containers
- Run containers using Docker images
- Get Tomcat server running on a container
- Deploy web application on the Tomcat server
- Build your own Docker images using Dockerfile
- Mapping ports from container on to the host machine
Install Docker
We are going to use Docker Community Edition (CE) as it is ideal to get started with Docker and experimenting.
Download and install Docker from https://docs.docker.com/install/
Choose the appropriate installation method depending on the OS you are using.
Once the installation is complete, open a command prompt terminal and type the command as below. Output similar to below verifies that your installation went ok.
| $ docker run hello-world
Unable to find image ‘hello-world:latest’ locally Hello from Docker! … |
As explained further down in the output generated, many steps were carried out in that one command.
To generate this message, Docker took the following steps:
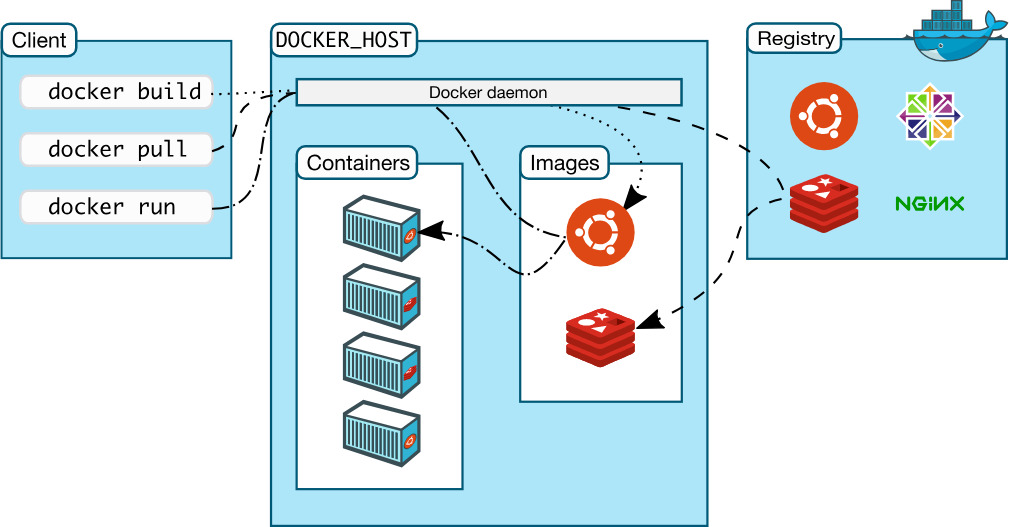
- The Docker client contacted the Docker daemon.
- The Docker daemon pulled the “hello-world” image from the Docker Hub.
- The Docker daemon created a new container from that image which runs the executable that produces the output you are currently reading.
- The Docker daemon streamed that output to the Docker client, which sent it to your terminal.
Don’t worry if the above is a mouthful, here is all you need to know for now.
Docker Engine is a client-server application with these major components:
- The Docker daemon is a service that runs on your host operating system. When you type any command, it is interpreted by the demon and it takes necessary actions.
- A REST API to talk to the daemon and instruct it what to do.
- A command line interface (CLI) client (the docker command).
Additionally, Docker Hub is the place where open Docker images are stored. You can pull images, make changes and push them back into this repository – sounds much like GitHub isn’t it?
Image source: docker.com
Source Code
All the code and the sample application needed for this tutorial is available in:
https://github.com/softwareyoga/docker-tomcat-tutorial
Clone it to your local computer
| $ git clonehttps://github.com/softwareyoga/docker-tomcat-tutorial.git
$ ls Dockerfile README.md sample.war |
Image
First, we search docker hub for an official image of Tomcat. So, what is an image?
To use a programming metaphor, if an image is a class, then a container is an instance of a class. Images are created with the build command, and they’ll produce a container when started with run
| $ docker search tomcat |
One of the results you should see is that of an official image.
| Tomcat Apache Tomcat is an open source implementati… [OK] |
Alternately, you could search directly on DockerHub website. Tomcat image information is available in https://hub.docker.com/r/_/tomcat/
Checking the documentation for the Tomcat page, we see that Tomcat built on the alpine version of Linux is smaller in size and ideal for experimentation.
Dockerfile
Once we have identified the image to use, we can write a Dockerfile specifying the base image to be used, the webapp to be used, etc.
It can build images by reading the instructions from a Dockerfile. Dockerfile contains all the commands a user could call on the command line to assemble an image. Using docker build users can create an automated build that executes several command-line instructions in succession.
Our simple Dockerfile is as follows:
| $ cat Dockerfile
FROM tomcat:8.0-alpine LABEL maintainer=”deepak@softwareyoga.com” ADD sample.war /usr/local/tomcat/webapps/ EXPOSE 8080 CMD [“catalina.sh”, “run”] |
The FROM instruction initializes a new build stage and sets the Base Image for subsequent instructions.
The LABEL instruction sets the Author field of the generated images. You could use any key-value pair in labels.
The ADD instruction copies new files, directories or remote file URLs from <src> and adds them to the filesystem of the image at the path <dest>.
In our case, we are adding the sample webapp and placing it in the folder /usr/local/tomcat/webapps/ on the container. That is because according to the Tomcat documentation, the War should be placed under CATALINA_BASE/webapps. It will be automatically expanded and deployed. From the Tomcat image documentation, we know that the default path CATALINA_BASE corresponds to /usr/local/tomcat on the container.
The EXPOSE instruction informs Docker that the container listens on the specified network ports at runtime.
The CMD instruction specifies what to run when the container (not the image) is run. In our case, TomCat server is started by running the shell script that starts the web container. There can only be one CMD instruction in a Dockerfile.
Don’t confuse RUN with CMD. RUN actually runs a command at build time.
Build
The build is run by the Docker daemon, not by the CLI. It downloads any images that are necessary and also executes the commands specified in the Dockerfile.
In the below command, the Dockerfile we created earlier is used (Docker daemon looks for Dockerfile specified by the current directory using a dot) and the newly built image is tagged mywebapp.
| $ docker build -t mywebapp .
Sending build context to Docker daemon 60.42kB Step 1/5 : FROM tomcat:8.0-alpine 8.0-alpine: Pulling from library/tomcat 4fe2ade4980c: Pull complete 6fc58a8d4ae4: Pull complete 7d9bd64c803b: Pull complete a22aedc5ac11: Pull complete 5bde63ae3587: Pull complete 69cb0c9b940a: Pull complete Digest: sha256:d02a16c0147fcae13d812fa670a4b3c9944f5328b10a5a463ad697d2aa5bb063 Status: Downloaded newer image for tomcat:8.0-alpine —> 624fb61775c3 Step 2/5 : LABEL maintainer=”deepak@softwareyoga.com” —> Running in 65215fcf5e93 Removing intermediate container 65215fcf5e93 —> a3edbcbc7229 Step 3/5 : ADD sample.war /usr/local/tomcat/webapps/ —> e40d36f46f93 Step 4/5 : EXPOSE 8080 —> Running in 724588a8c1f3 Removing intermediate container 724588a8c1f3 —> 3310b442e997 Step 5/5 : CMD [“catalina.sh”, “run”] —> Running in dd5ed463f256 Removing intermediate container dd5ed463f256 —> ab09b4cafc66 Successfully built ab09b4cafc66 Successfully tagged mywebapp:latest |
If this is the first time you are running this, it might take a few minutes to complete as the Tomcat image (and any of its dependencies) has to be downloaded.
You can now verify that the mywebapp image is built and ready to be used. Note that at this point, you have only built the image, there is no running container.
| $ docker image ls
REPOSITORY TAG IMAGE ID CREATED SIZE mywebapp latest ab09b4cafc66 About a minute ago 147MB tomcat 8.0-alpine 624fb61775c3 6 weeks ago 147MB |
To actually run the container using the image, follow the steps below.
Run the Container
The CLI has a command called run which will start a container based on a Docker Image. The structure is docker run <options> <image-name>.
As we mentioned before, the EXPOSE instruction in the Dockerfile doesn’t actually publish the port. To so that when running the container, use the -p flag on docker run to publish and map one or more ports.
So for mapping the container port 8080 for the mywebapp image to port 80 on the host machine, we execute:
| $ docker run -p 80:8080 mywebapp
30-Oct-2018 22:17:48.498 INFO [main] org.apache.catalina.startup.VersionLoggerListener.log Server version: Apache Tomcat/8.0.53 30-Oct-2018 22:17:48.503 INFO [main] org.apache.catalina.startup.VersionLoggerListener.log OS Name: Linux 30-Oct-2018 22:17:48.505 INFO [main] org.apache.catalina.startup.VersionLoggerListener.log Java Home: /usr/lib/jvm/java-1.7-openjdk/jre 30-Oct-2018 22:17:48.506 INFO [main] org.apache.catalina.startup.VersionLoggerListener.log CATALINA_BASE: /usr/local/tomcat 30-Oct-2018 22:17:48.506 INFO [main] org.apache.catalina.startup.VersionLoggerListener.log CATALINA_HOME: /usr/local/tomcat … // LOGS cut for brevity … 30-Oct-2018 22:17:48.691 INFO [main] org.apache.catalina.startup.Catalina.load Initialization processed in 926 ms … 30-Oct-2018 22:17:50.212 INFO [main] org.apache.catalina.startup.Catalina.start Server startup in 1520 ms |
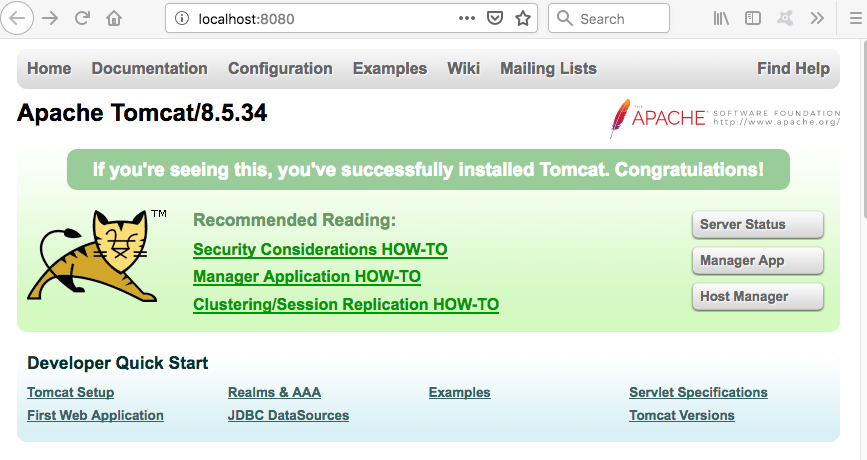
Open http://localhost:80/ in a browser to see the sample web application running.
Additional useful Docker commands
By default, it will run a command in the foreground. To run in the background, the option -d needs to be specified. Doing so will output the container ID that could be used for other commands as below.
| $docker run -d -p 80:8080 mywebapp 8e6e1c6b2ab8340a626ffdbf2e78252d861bd01d7f14da1b6d08c7530ebf5a11 |
The command docker inspect <container-id> provides more details about a running container, such as IP address.
The command docker logs <container-id> will display messages the container has written to standard error or standard out.
The command docker ps lists all the running containers.
Summary
Congratulations, you have just run your first Docker container!
Of course, there is more to Docker than this simple tutorial. In real life situations, you would want the sample application built using Maven or gradle and included in the image. Your Dockerfile would also have many more instructions such as defining environment variables, copying files into docker volumes etc.
However, this was a starting point to see and experience first-hand how to run a web application on Docker. For further reading, I recommend Docker documentation which is quite comprehensive.


